Penlab
▰ About ▰ Links ▰ Gallery ▰ Her
Objective:To build a personal Penetration Testing Lab in a secured and controlled environment. ▨ Software
▨ Architecture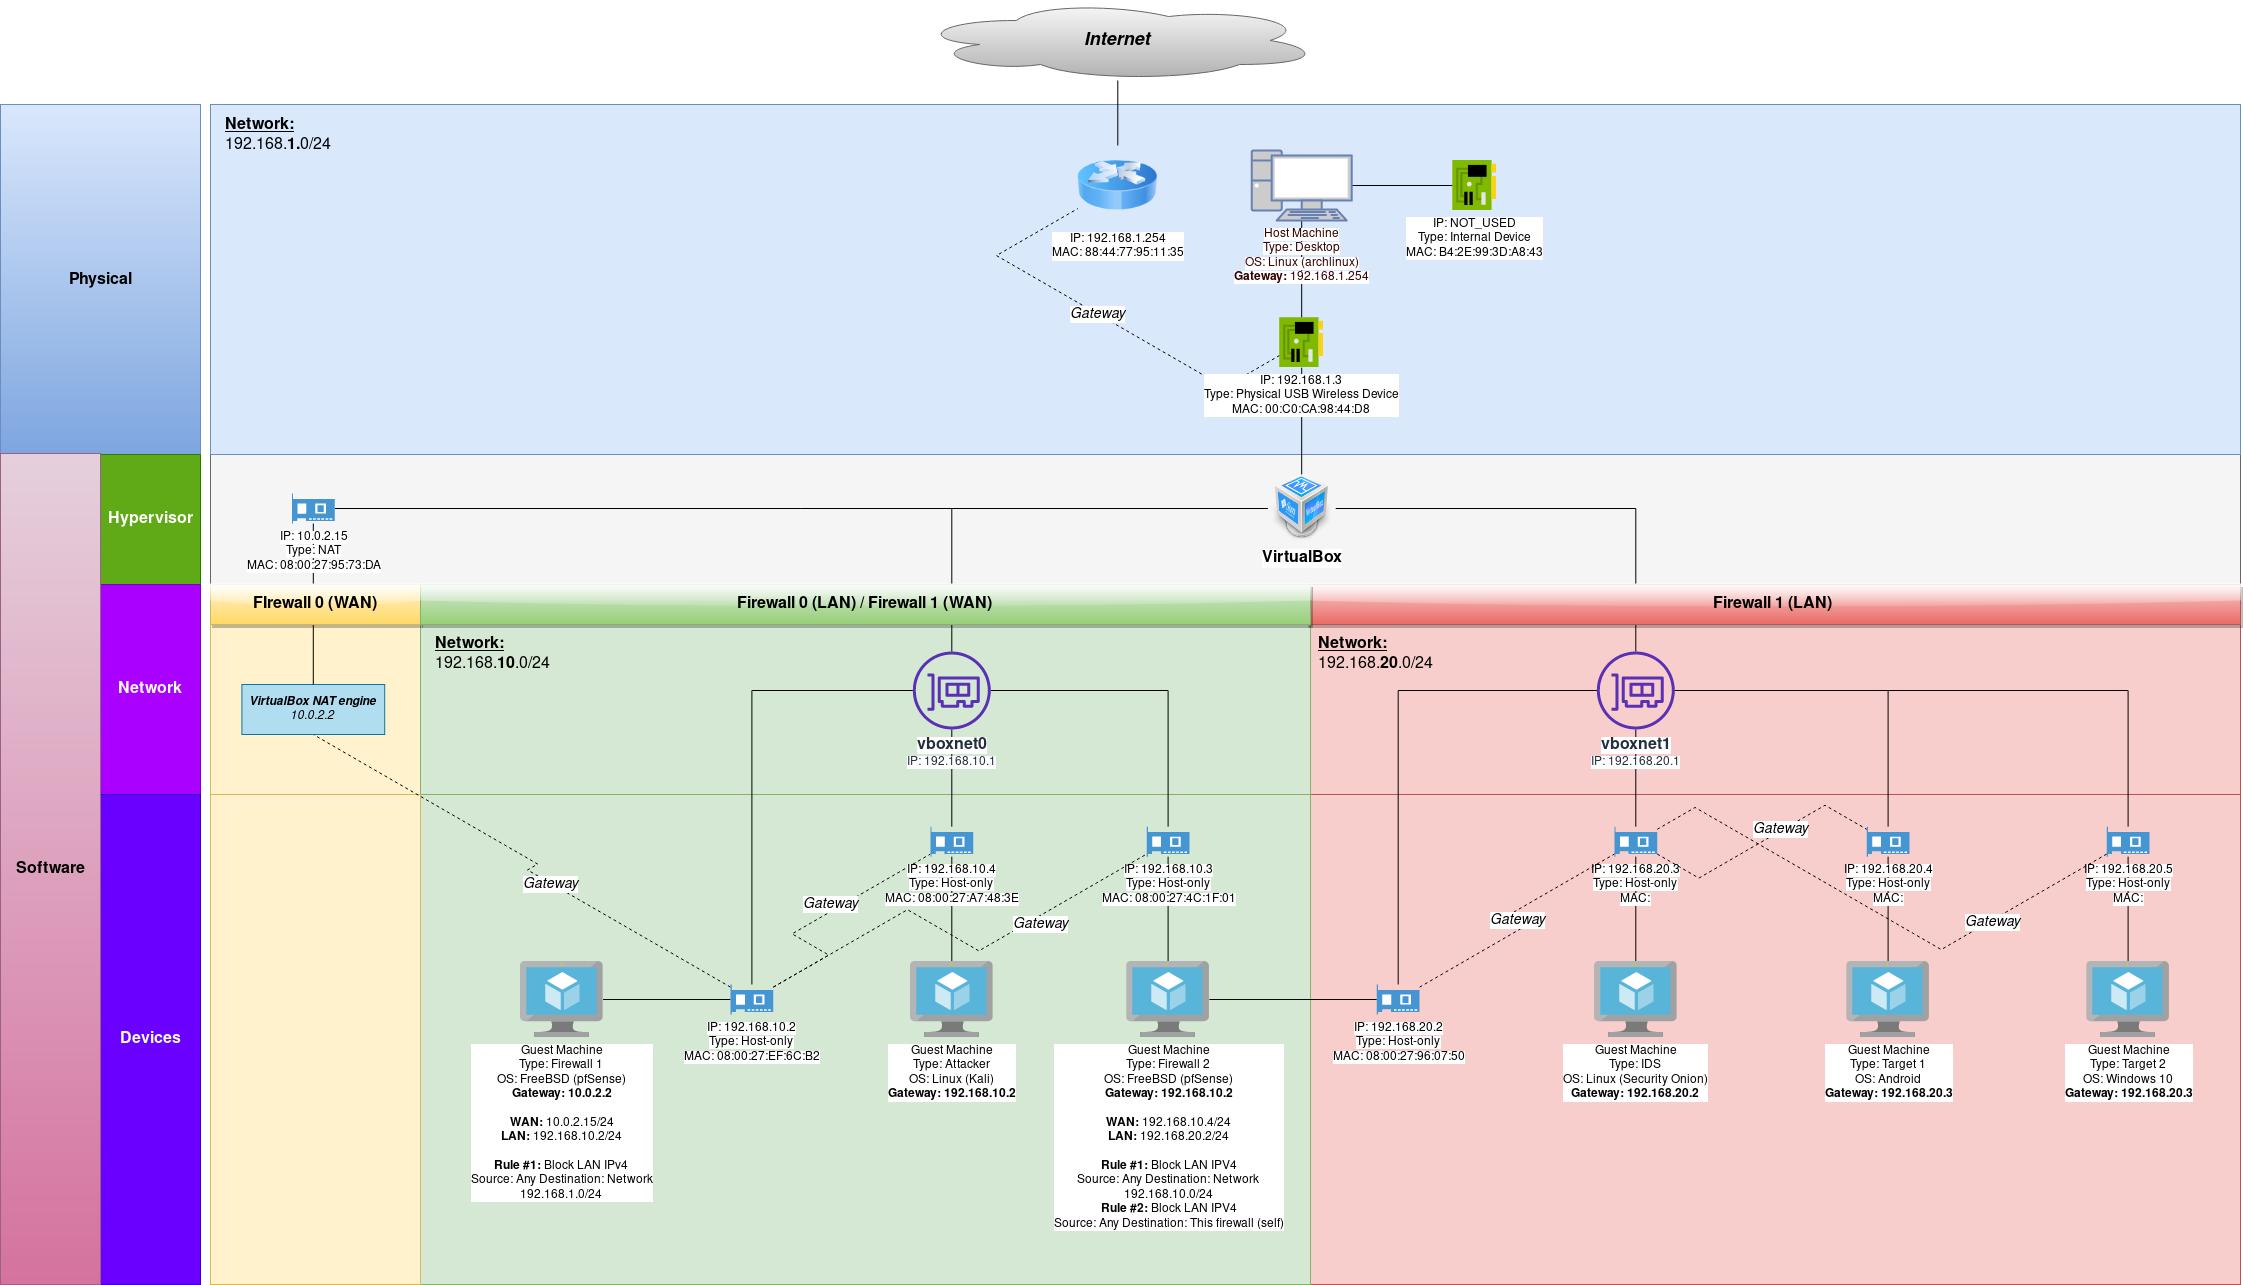
Hypervisor:▨ InstallationVirtualBox will be used as the hypervisor.
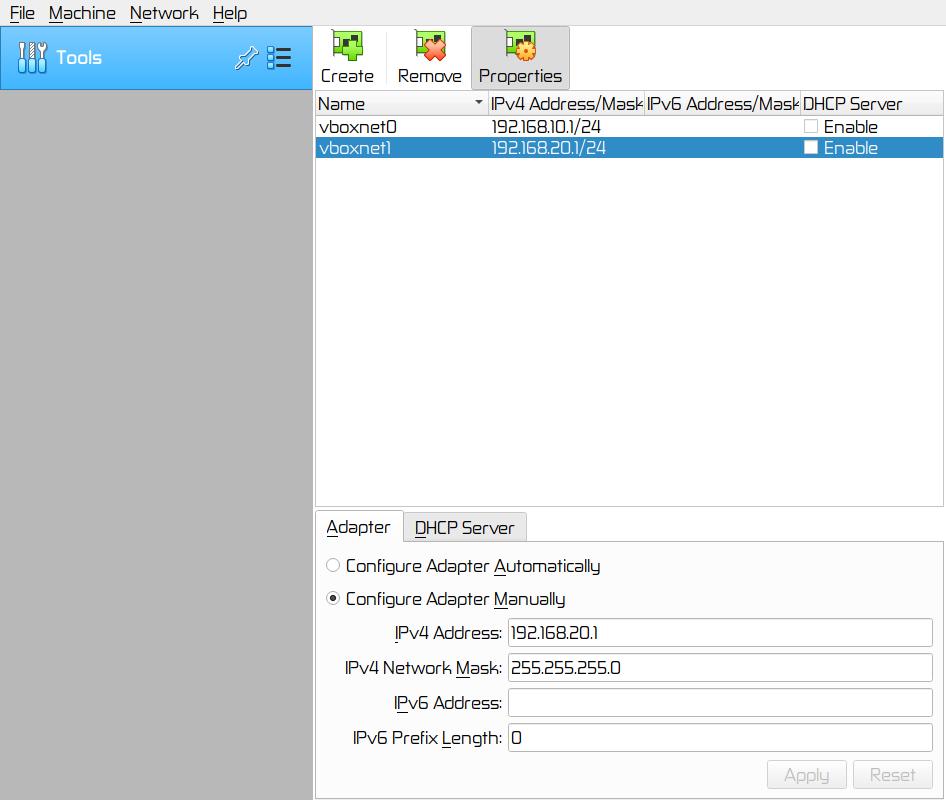
▨ ConfigurationCreate two NIC (Network Interface Card) adapters, they will be used as two separate networks. Go to Tools ▸ Network ▸ Create. Class C will be provide enough IPs for this lab.
Firewall 0:
▨ InstallationCreate a new VM (Virtual Machine) using Machine ▸ New, and enter the necessary details to create a new pfSense VM box. Set the pfSense ISO file as a Live CD/DVD in the VM Optical Drive and start the VM. The installation is a straight-forward process, accept the copyright notice ▸ select Install pfSense ▸ Continue with default keymap ▸ Auto (UFS) and wait until the installation finishes. Once at the "Manual Configuration" screen select No and then Reboot. Important: ▨ ConfigurationStart the VM, pfSense should create the WAN network automatically. When booting is finished, change the LAN network to use the hypervisor NIC adapter IP with option "2) Set Interface(s) IP address", and then select the LAN interface. Enter 192.168.10.2 in the LAN IPv4 Address, and 24 in the LAN IPv4 subnet bit count. Leave the next questions as per default values. When asked if "Do you want to enable the DHCP server on LAN?" select y and use 192.168.10.4 as the start address and 192.168.10.254 as the end address in the DHCP range. 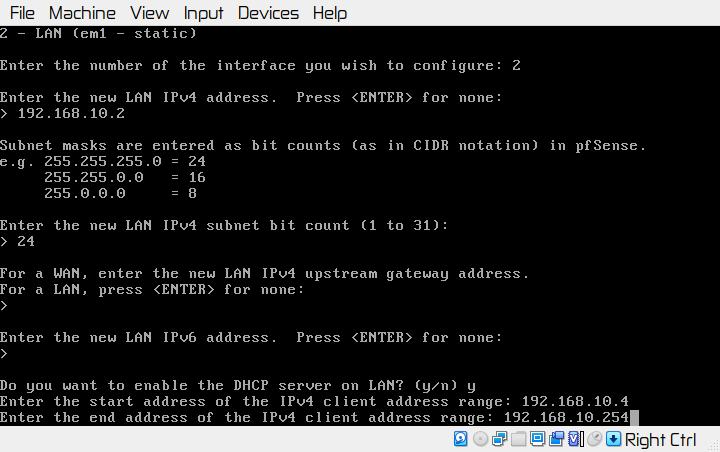
When asked "Do you want to revert to HTTP as the WebConfigurator protocol? select n Important: It's time to add a rule on to the LAN network to protect the physical machine's network by adding a rule on the firewall to prevent any connection attempts from within the lab. Start the VM and open a browser pointing at the firewall IP (https://192.168.10.2/) and login. Note: Go to Firewall ▸ Rules ▸ LAN ▸ Add and set the new rule as Action: Block, Protocol: Any, Destination: Network 192.168.1.0/24, Description: My Lab, my rules (Block access to 192.168.1.0/24 Physical Network). When done save the new rule. 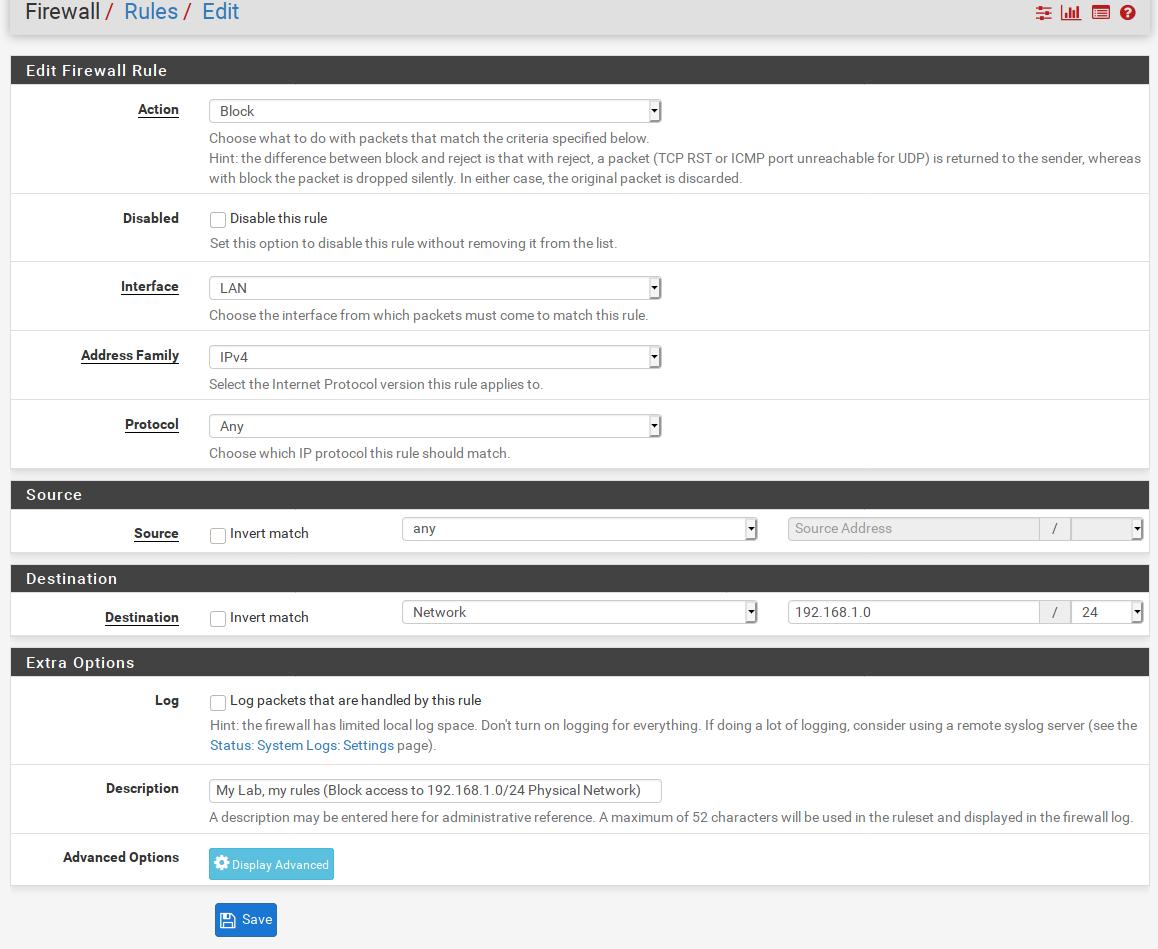
Important: 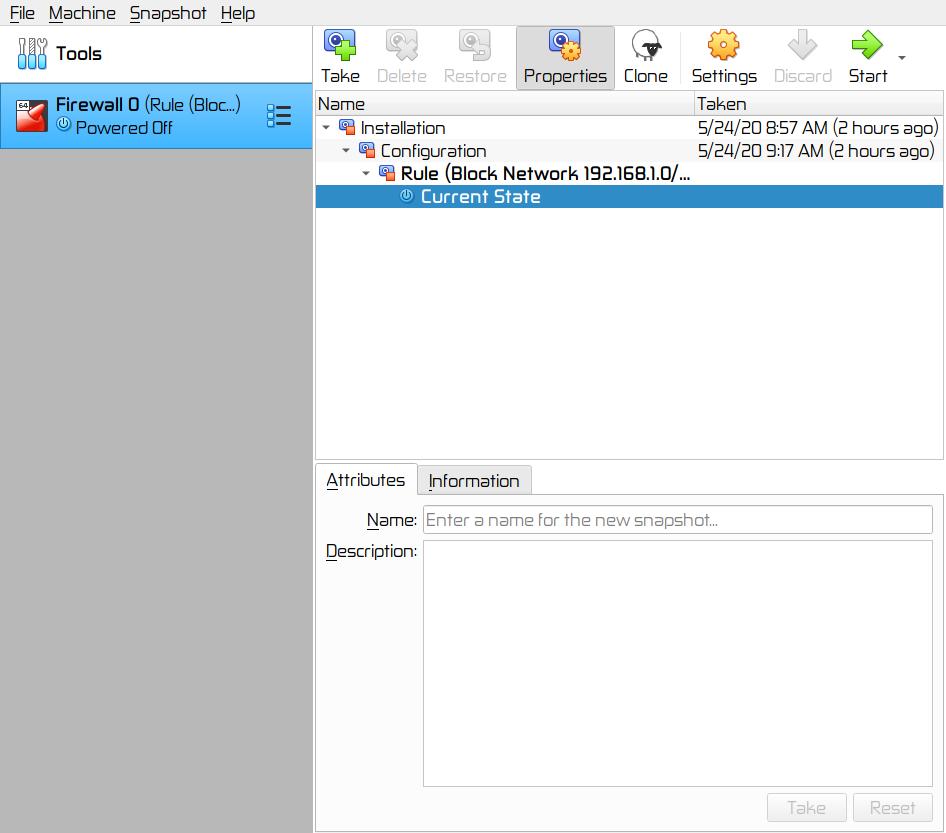
The first firewall, Firewall 0 is now installed and configured. The VM configuration details should be similar to the below: 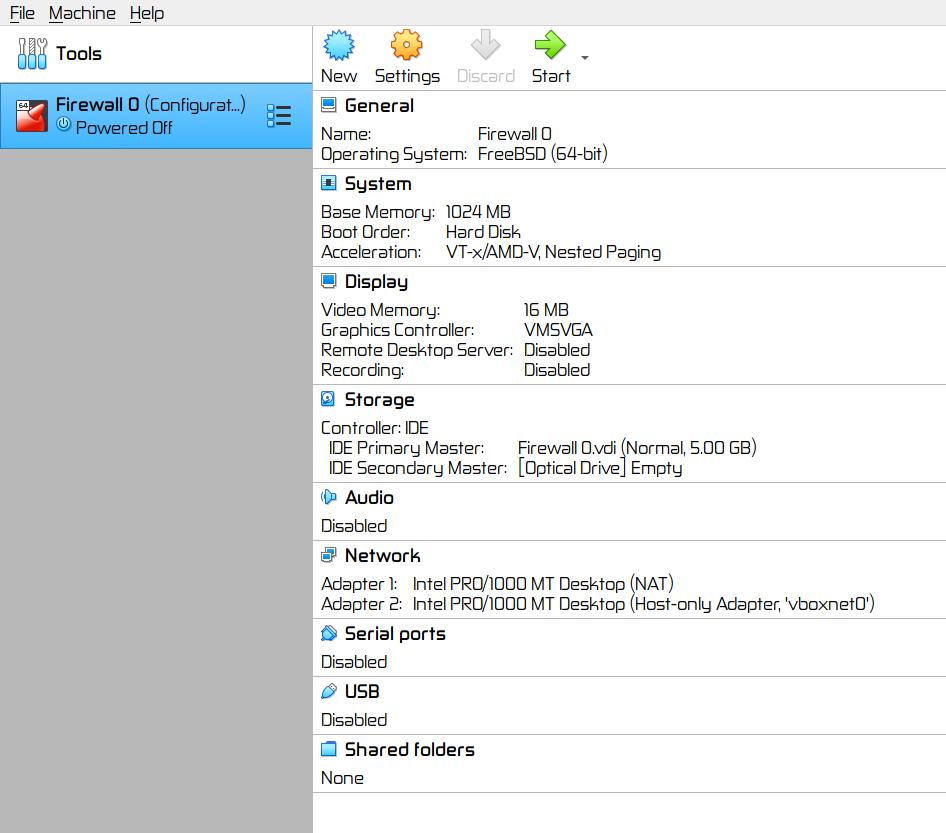
Firewall 1:
▨ InstallationCreate a new VM (Virtual Machine) using Machine ▸ New, and enter the necessary details to create a new pfSense VM box the same way as done in Firewall 0 installation. ▨ ConfigurationStart the Firewall 1 VM, pfSense should create the WAN & LAN network interfaces automatically. Changes will have to be made to both WAN & LAN network interfaces in order to setup the correct IPs. Select option "2) Set Interface(s) IP address", then select "1) WAN" and when asked "Configure IPv4 address WAN interface via DHCP?" select "n", set 192.168.10.3 as the WAN IPv4 Address, 24 as the LAN IPv4 subnet bit count and 192.168.10.2 as the upstream default gateway (the Firewall 0 IP address), select "n" for IPv6 DHCP and leave everything else as per default values. Repeat the same process but this time select the LAN interface option 2 to make changes to. Set 192.168.20.2 as the LAN IPv4 Address, and 24 as the LAN IPv4 subnet bit count and set the default values on the next questions. When asked if "Do you want to enable the DHCP server on LAN?" select "y" and set 192.168.20.4 as the start address and 192.168.20.254 as the end address. When asked "Do you want to revert to HTTP as the WebConfigurator protocol? select "n". The configuration is done, continue until reaching the main menu. Important: It's time to add a few rules on to this LAN network to protect the vboxnet0 LAN network. Start the VM and open a browser pointing at the firewall IP (https://192.168.20.2/) and login. Note: Go to Firewall ▸ Rules ▸ LAN ▸ Add and set the first new rule as Action: Block, Protocol: Any, Destination: Network 192.168.10.0/24, Description: My Lab, my rules (Block access to 192.168.10.0/24 Network). When done save the new rule. 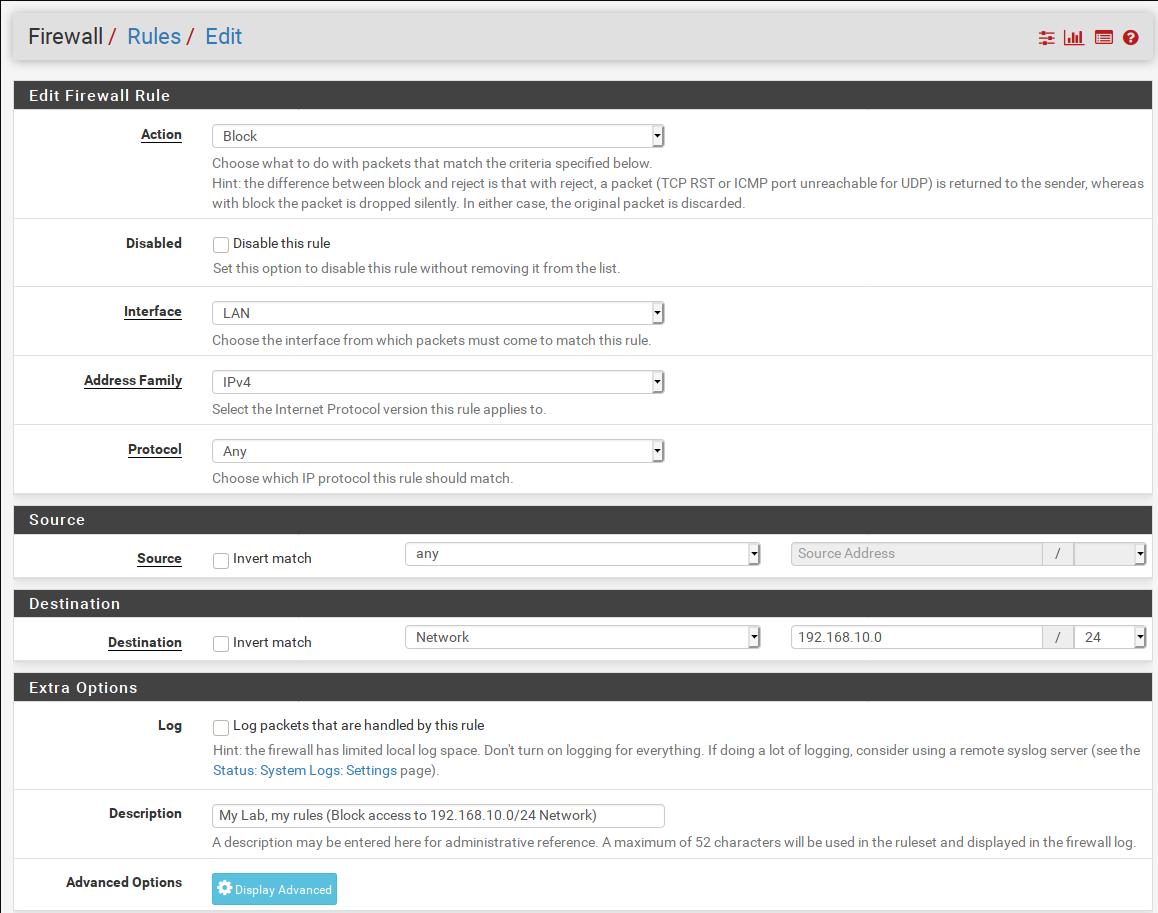
Time to add a second rule, go to Firewall ▸ Rules ▸ LAN ▸ Add and set the new rule as Action: Block, Protocol: Any, Destination: This firewall (self), Description: My Lab, my rules (Block 192.168.20.2 Firewall/Internet Gateway). This rule not only prevents access to the Firewall 1 but also prevents traffic through the Gateway and thus preventing access to the internet. When done save the new rule. 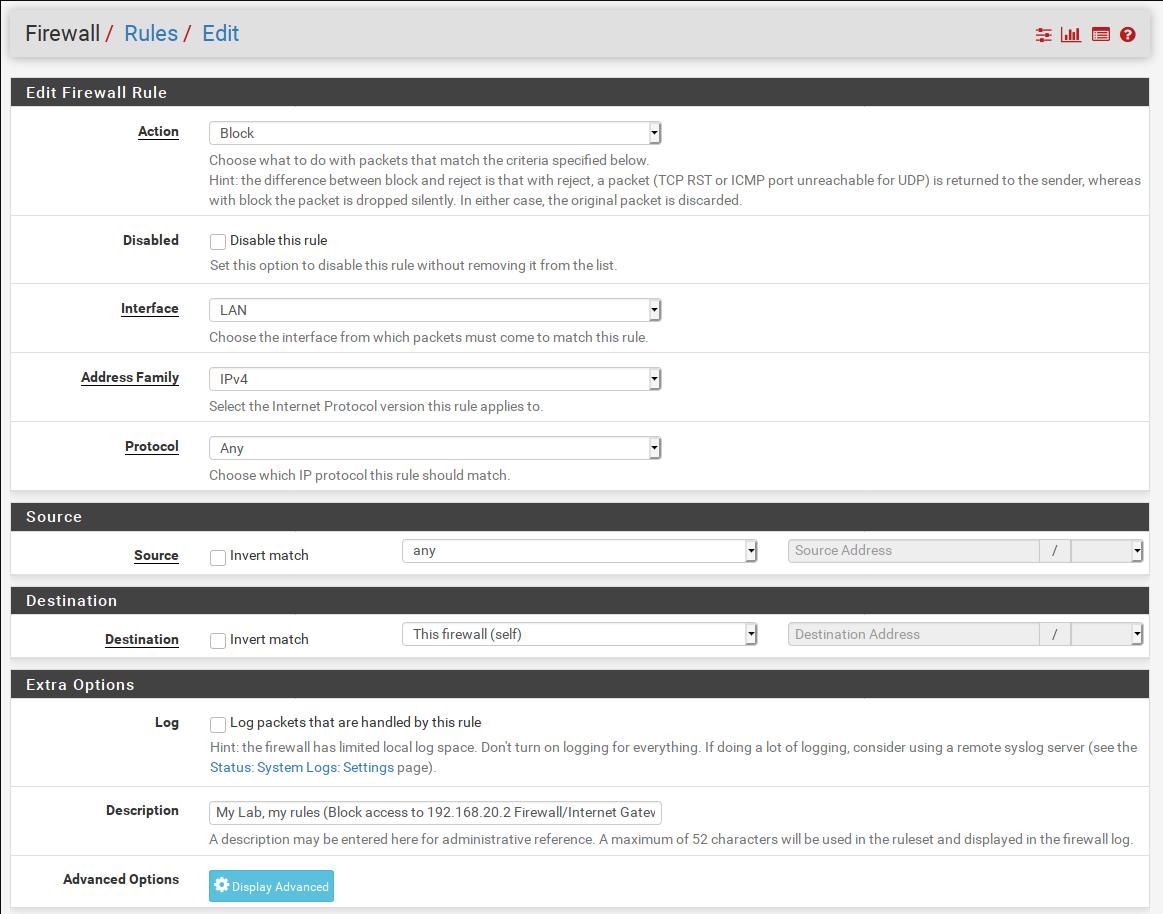
Important: The second firewall, Firewall 1 is now installed and configured. The VM configuration details should be similar to the below: 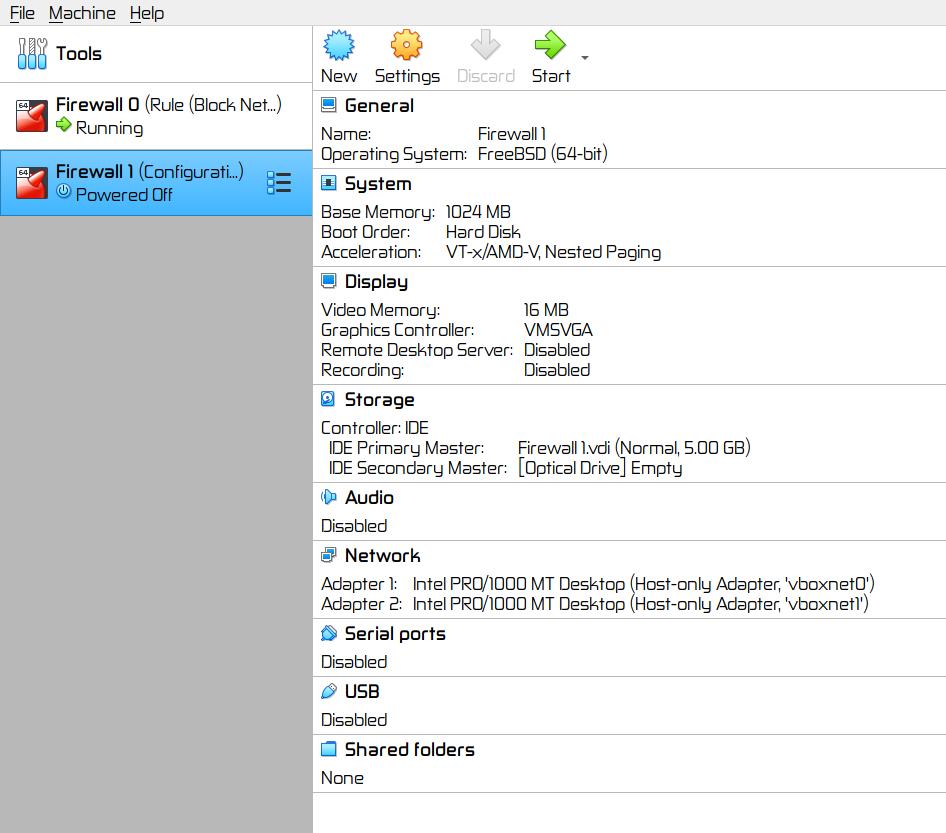
Attacker:
▨ InstallationImport an existing pre installed Kali environment into VirtualBox by using File ▸ Import Appliance ▸ Select OVA file from Local File System source ▸ Next ▸ Change MAC address Policy to "Generate new MAC addresses for all network adapters ▸ Import ▸ Agree with Software License Agreement. 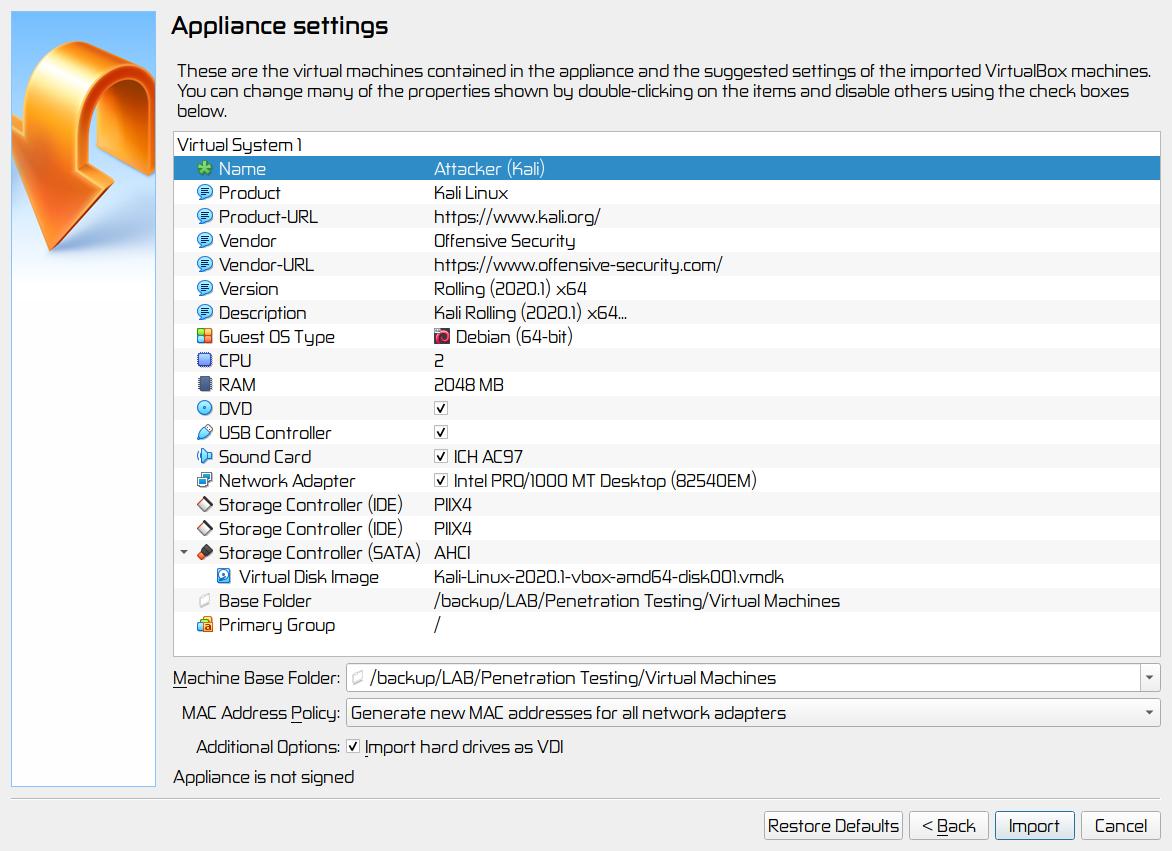
When finished importing the appliance, change the Network Adapter 1 from NAT to a Host-only Adapter using vboxnet0 network. Important: Important: ▨ ConfigurationStart the Firewall 0 VM. Wait until it's fully booted and then start the Attacker (Kali) VM. Note: Type the following command in a terminal window to add a new user, set the user password and fill in any required extra information: Add the newly created "attacker" user to the sudo group by using the command: Lock the default kali account to prevent its use: Install the latest available updates on the system by issuing the following command in a terminal window: Change the VM IP to a Static IPv4 (Method: Manual) IP 192.168.10.4, Netmask: 24, Gateway 192.168.10.2, DNS Server 192.168.10.2 and Search domains: 8.8.8.8: 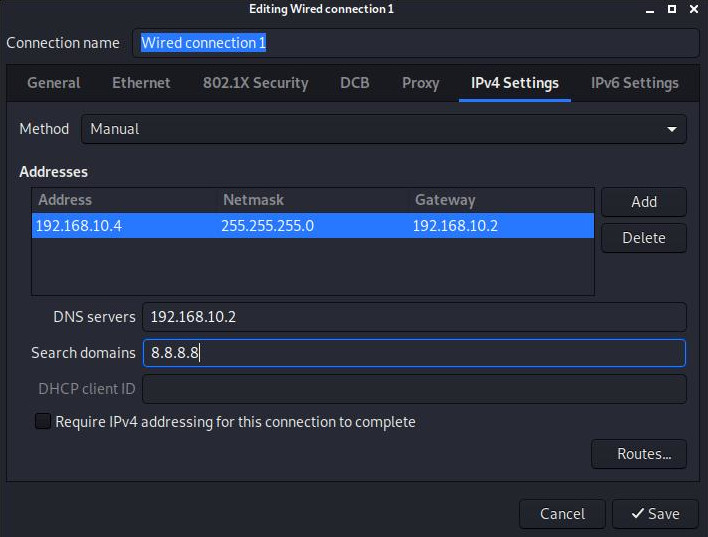
Finally, make any other configuration changes to language, keyboard, clock or any other settings. Important: The Attacker is now installed and configured. The VM configuration details should be similar to the below: 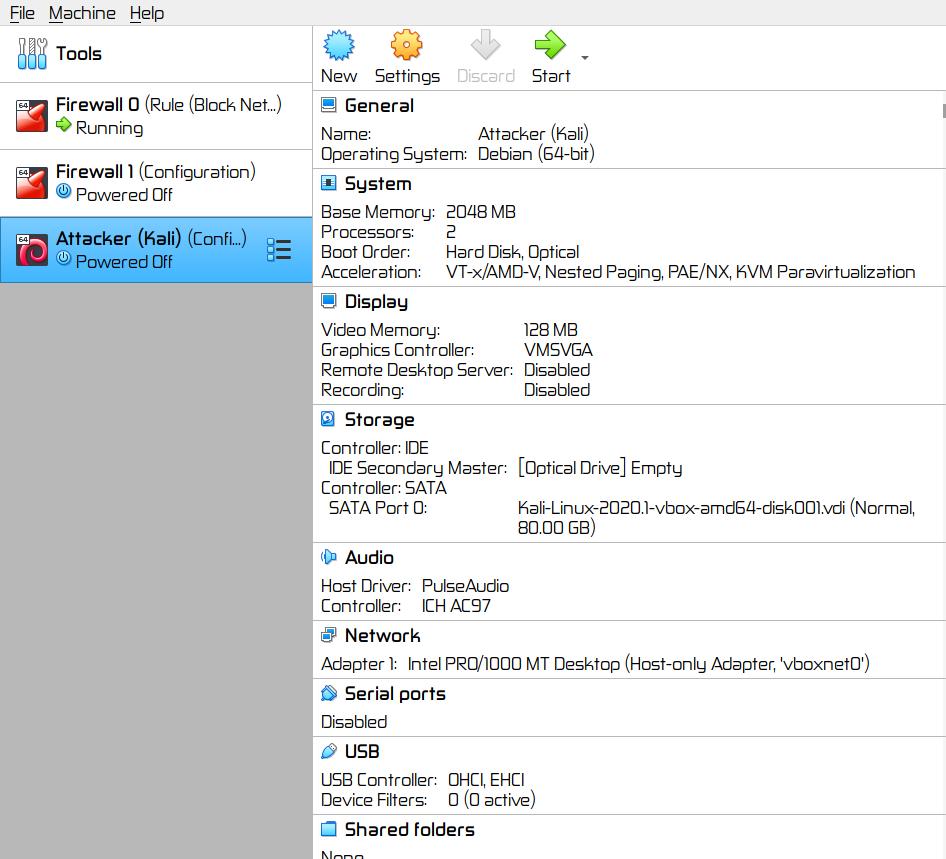
IDS (Sentinel):
▨ InstallationCreate a new VM (Virtual Machine) using Machine ▸ New, and enter the necessary details to create a new Security Onion VM box. Set the Security Onion ISO file as a Live CD/DVD in the VM Optical Drive and set the Network Adapter 1 to a Host-only Adapter using vboxnet1 network. Important: Start the Firewall 0 VM, then the Firewall 1 VM. Important: Start the Sentinel (Security Onion) VM, once it's booted run "Install SecurityOnion 16.04" available from the desktop icon ▸ select language ▸ tick "Download updates while installing Security Onion" ▸ Install Now ▸ select location ▸ select keyboard ▸ add user and wait until the installation finishes ▸ Restart. Important: ▨ ConfigurationStart the VM and login with the user credentials created during installation. Change the VM IP Wired network to a Static IPv4 (Addresses: Manual) Address 192.168.20.3, Netmask: 24, Gateway 192.168.20.2, DNS Server 192.168.20.2, turn off IPv6: 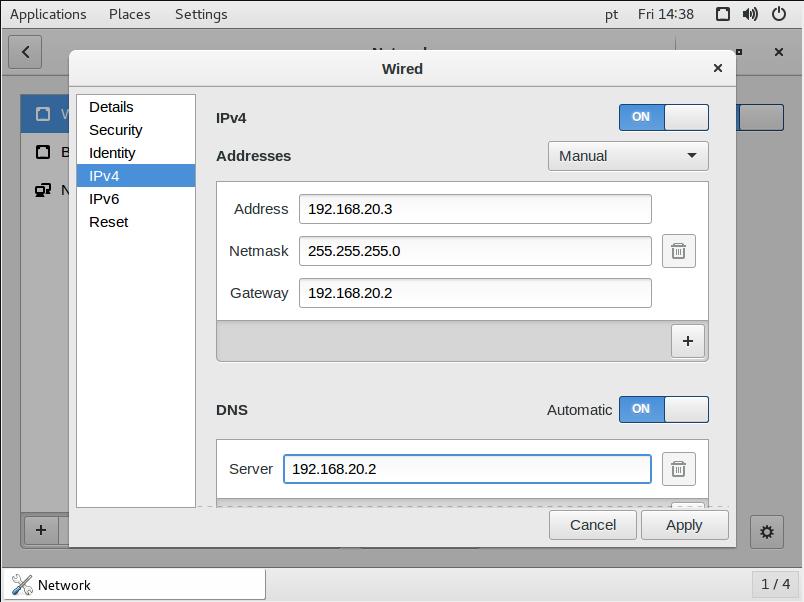
Make any other configuration changes to language, keyboard, clock or any other settings. To continue, run "Setup" from desktop, enter user password and a wizard will popup ▸ Yes, continue ▸ Yes, configure /etc/network/interfaces! ▸ Select "static" ▸ IP: 192.168.20.3 ▸ Netmask: 255.255.255.0 ▸ Gateway: 192.168.20.2 ▸ DNS: 192.168.20.2 ▸ Domain name: secon.com ▸ Yes, make changes! ▸ Yes, reboot! To continue, run "Setup" from desktop once more, enter user password and a wizard will popup ▸ Yes, skip network configuration! ▸ Yes, continue ▸ Evaluation Mode ▸ Create a user account ▸ Password ▸ Yes, proceed with the changes! ▸ Wait for a while and done, click OK on all popups. Important: The Sentinel is now installed and configured. The VM configuration details should be similar to the below: 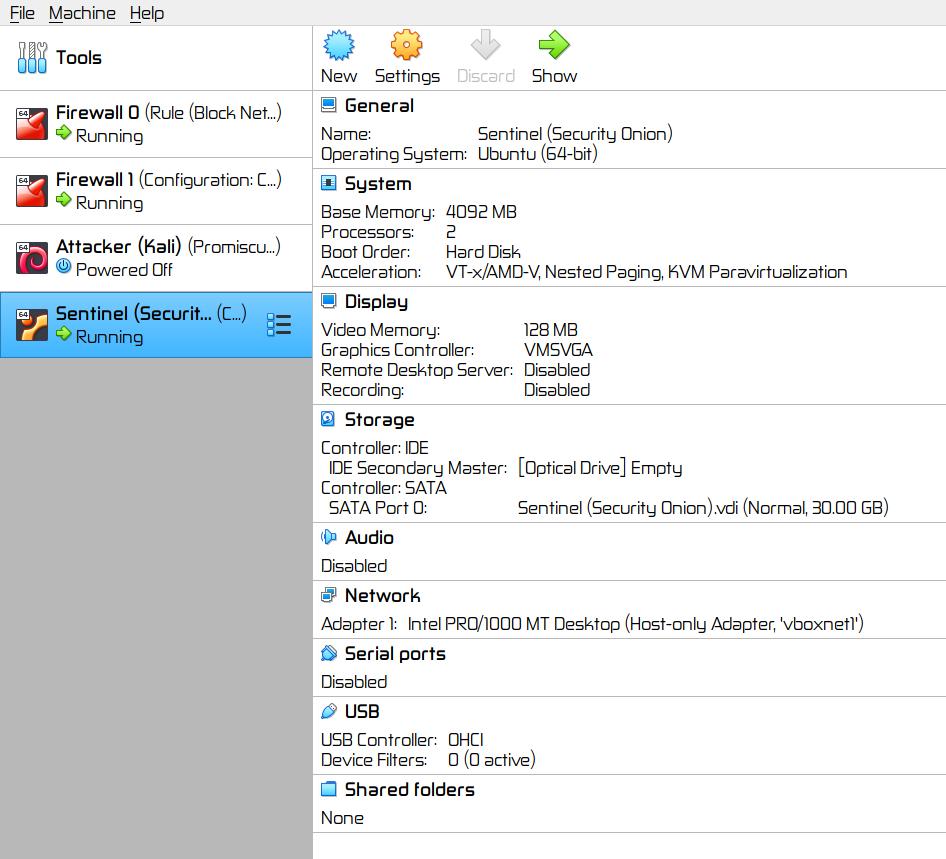
TargetImportant: ▨ InstallationTo setup the Target machine, download Ubuntu Server edition and create a new VM in VirtualBox using Machine ▸ New, and enter the necessary details to create the new VM box. Set Network Adapter 1 as Host-only Adapter using vboxnet1 network and set the Ubuntu Server ISO file as a Live CD/DVD in the VM Optical Drive. Start the VM. When installing Ubuntu Server, choose your Language ▸ Keyboard ▸ Network connections set a static IP address assigning subnet to 192.168.20.0/24, address to 192.168.20.3, gateway to 192.168.20.2, nameserver to 192.168.20.2 and search domains to 8.8.8.8 ▸ Save ▸ Done. 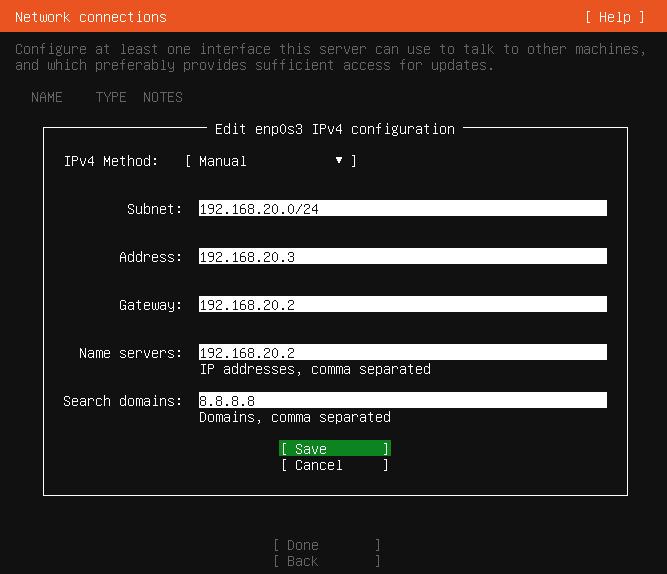
Leave everything else as per default values ▸ Add username and password details ▸ Continue using default values ▸ Installation ▸ Reboot. Important: Important: Install the latest available updates on the system by issuing the following command: ▨ ConfigurationAdd vulnerable applications. A better alternative is to use Metasploitable 3 distribution. |